Safety First: Prioritizing Your Well-being
Before embarking on any roofing project, safety should be your top priority. Working at heights poses significant risks, so it’s crucial to entrust shingling tasks to qualified professionals trained in roof construction safety. Additionally, familiarize yourself with local building codes to ensure compliance and safety throughout the process.

Understanding Roof Physics: The Key to Success
To master asphalt shingle installation, it’s essential to grasp the fundamentals of how a sloped shingle roof operates. Asphalt roofing shingles rely on gravity to efficiently shed water from rain or snowmelt. Proper arrangement and overlapping of roof components are vital to ensure effective water shedding.
Deck Preparation: Setting the Stage for Success

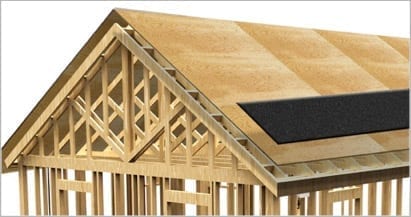
Prepare your roof deck meticulously before laying any roofing materials. Ensure the deck is smooth, securely fastened to trusses, dry, and free of gaps or holes. A clean, flat deck surface will ensure the final shingled roof appears smooth and even.
Working from the Bottom Up: The Right Approach
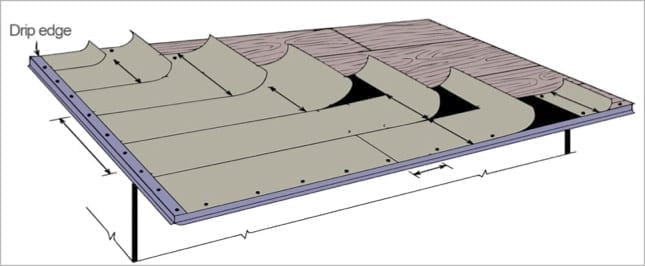
Starting from the bottom of the roof and working upwards, begin with the installation of the drip edge at the eave. This provides a clean edge for the roof’s start and protects the roof deck’s lower edge from water damage.
Ice & Water Shield: Shielding Against Winter Woes
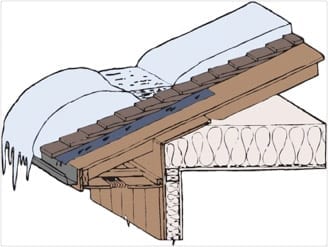
If you reside in an area characterized by harsh winter conditions, you understand the importance of wearing boots to shield your feet from ice, slush, and puddles. Similarly, your roof and the dwelling beneath it require comparable safeguarding, which is precisely what an ice and water protector delivers. This ultra-thin, self-adhesive membrane serves as a vital component and is installed over the drip edge. While proper attic ventilation, insulation, and a vapor barrier are primary deterrents against ice dam formation, integrating an ice protection membrane into your roofing system is a prudent choice, often mandated by local building codes in colder climates. Typically, this membrane extends beyond the eaves by 1/4″-3/4″ and should reach at least 24″ inward from the wall’s vertical extension to maximize effectiveness. Additionally, it’s essential to flash any roof valleys with this membrane. Ice and water protectors operate by creating a seal around the shanks of the overlying shingle fasteners, enhancing the roof’s water-shedding capabilities.
Underlayment Installation: Enhancing Protection
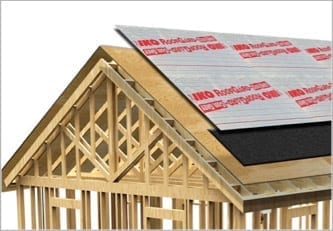
Now, it’s time to focus on the roof underlayment, a crucial layer that sits beneath the shingles. This underlayment can come in two forms: asphalt-saturated felt or synthetic roof underlayment. Both options offer essential protection for your roof. While the asphalt shingles primarily repel water, the underlayment provides additional benefits. When installing asphalt-saturated felt, it’s essential to lay it in horizontal courses, ensuring it overlaps the eave ice and water protector by 4 inches and the valley membrane flashing by 6 inches. However, if you live in an area where ice and water protection isn’t mandatory, you can begin the underlayment installation at the eave, ensuring it overhangs the drip edge by 1/4 to 3/4 inches.
Remember the drip edge we installed at the bottom of the roof?
As we progress up the sloped edges of the roof, known as the “rakes,” the drip edge is placed on top of the underlayment. Although this may seem counterintuitive to the overlapping principle, installing the drip edge over the underlayment at the rakes creates a neat roof edge and enhances the underlayment resistance against wind uplift. Additionally, any wind-driven rain hitting the rake edge would flow over the top flange of the drip edge and onto the underlayment, preventing potential issues caused by water seeping beneath the underlayment.
Flashing at Joints and Valleys: Preventing Leaks
When it comes to potential leaks in a roof, they are most likely to occur at points where the shingle layer is penetrated, interrupted, or where it meets a wall. These critical areas require flashing, an extra layer of material designed to shed water and direct it downslope. Roof valleys can either be open or closed; open valleys are left uncovered by shingles, while closed valleys are covered during shingle installation. If your roof will feature open valleys, as recommended by IKO, it’s essential to line them with a pre-formed strip of corrosion-resistant metal at this stage. Closed valleys, on the other hand, are addressed later during shingle installation.
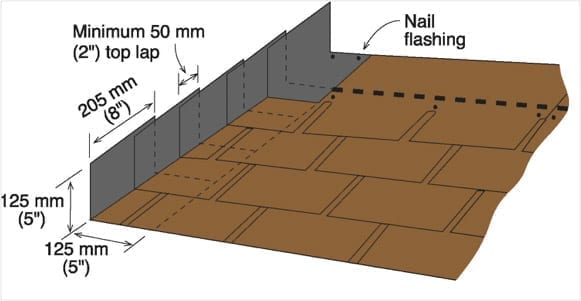
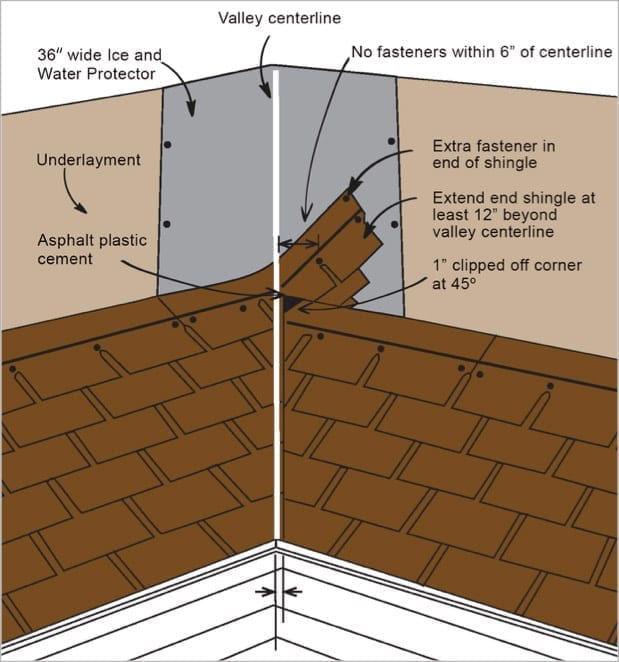
For optimal roof performance, We strongly advocates for open metal valleys. Before applying roofing shingles, complete the installation of underlayment and valley flashing. The preferred material for flashing is 28-gauge galvanized metal or an equivalent corrosion-resistant material, in accordance with local codes. Begin by centering a 36-inch strip of ice and water protector membrane in the valley, temporarily securing it along one edge before carefully peeling away the backing and smoothing out any wrinkles. Proceed from the eave, ensuring that additional pieces overlap by at least 6 inches. Once in place, center a minimum 24-inch wide metal valley liner in the valley, fastening it at the edges with nails and overlapping each metal piece by at least 6 inches. Apply asphalt plastic cement under each section of overlap.
To ensure proper alignment, snap two chalk lines along the full length of the valley, spaced 6 inches apart at the top and increasing in width towards the bottom. When installing shingles, lay them over the valley flashing, trim the ends to the chalk line, and nail them at least 2 inches back from the line. Cut a 2-inch triangle off the top corner of each shingle to direct water into the valley, embedding the valley end of each shingle into a 3-inch band of asphalt plastic cement. Flashing should also be applied around plumbing stacks and attic vents, as these are common roof penetrations. Additionally, install metal flashings where shingles meet walls or chimneys. Ice and water protector membranes are effective for flashing and protecting tricky roof areas such as skylights, dormers, and turbines. Ensure that flashing materials are applied in conjunction with the shingle installation procedure, allowing them to work together to protect around joint areas.
Field Shingle Installation: Bringing It All Together
Once all the foundational elements are in place beneath the shingles, it’s time to dive into the process of shingling the roof. Regardless of the type or style of asphalt shingles you’ve selected, the procedure remains consistent. Starting from the bottom, you overlap each layer as you progress across and upwards on the roof. Before laying down the main field shingles, it’s crucial to install a preparatory course of starter shingles. These are specifically designed for this purpose, although you can also cut standard shingles to size if needed. Both types serve essential functions at the roof’s eave, providing a point for sealant adhesion for the first course of shingles and offering water-shedding protection at shingle joints and cut-outs.
Professional contractors often opt for starter strips along rake edges, ensuring a straight edge from which all field courses can begin and enhancing the roof system’s wind resistance. Following the manufacturer’s instructions for the specific roof shingle is vital, as not all shingles have the same exposure, offset, or nail placement. Improper installation, such as giving the shingles too much or too little exposure or failing to offset them correctly, can lead to issues. Nailing the shingles correctly is critical for both the roof system’s wind resistance and the shingles’ limited warranty coverage.
If closed valleys are chosen, they are completed as the shingle courses approach and run through the valley. The most common type is a “closed cut” valley, where shingles are installed on one side of the valley first, with each shingle course extending at least 12 inches through the valley centerline. As shingles are added to the adjoining roof area, the end of each course is trimmed 2 inches back from the valley centerline.
Hip and Ridge Caps: Finishing Touches
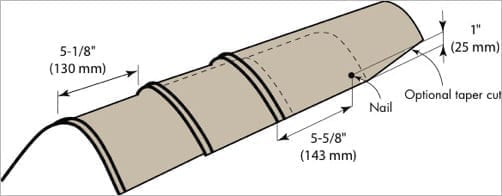
As you secure the final field shingle in place, you’re nearing the completion of your roofing project. Congratulations! The last step in this journey is the installation of the hip and ridge capping. When reaching the peak of the roof with the field shingles, it’s important to note that simply bending them over won’t suffice. Instead, individual ridge cap shingles are utilized to cover the ridge and channel water down both slopes.
There are various ridge cap shingle options available, but they all follow the same principle of overlapping during installation. For hips, you begin at the bottom and work upwards. Unlike hips, ridges are on a horizontal plane, so the upward slope principle doesn’t apply. Therefore, ridge cap shingles are typically installed starting from the end of the ridge opposite the prevailing wind direction to enhance wind resistance.
Alternatively, on hip roofs, it’s acceptable to start installing the ridge caps at each end of the ridge, with the final piece placed in the middle. Ensure the last ridge cap piece is securely nailed in place. Since this area will have exposed nail heads, it’s essential to seal them with suitable asphalt roof cement. Remember to use longer nails for ridge cap shingles to ensure they penetrate through to the roof deck, securing them in place effectively.
Comments are closed